Recipe: Strawberries and Cream Ice Cream Mochi Recipe »

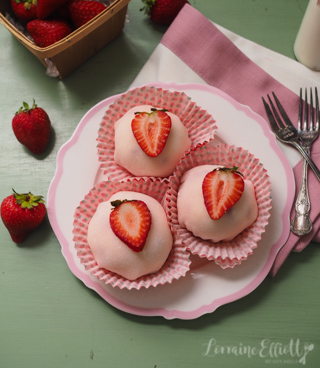
Who loves ice cream mochi? How about fresh cream mochi? Mochi ice cream is one of the most popular snacks and the whole world is finally discovering this delicious sweet treat! But did you know that making your own mochi is easy? Today I'm showing you how to make the most delicious ice cream and fresh cream mochi filled with fresh fruit! I am sharing all of my tips and tricks so that you end up with perfect mochi every time! This is a pushy recipe Dear Reader!
Ice cream mochi is a scoop of ice cream wrapped in a mochi skin. It has become so popular that you can get it at supermarkets now. Mochi has a unique texture that can be described as chewy, soft, and slightly sticky. When you take a bite of mochi, it has a firm and slightly elastic texture that requires some effort to bite through. As you continue to chew the mochi becomes softer and stickier in your mouth, giving it a creamy and smooth mouthfeel. I love the stuff so much that I named my first dog Mochi after the beloved sweet treat.

Ice cream mochi is a modern variation of traditional Japanese mochi which has been around for centuries. While the exact origin of ice cream mochi is not clear, it is believed to have been first created in Japan in the 1980s. One popular story attributes the invention of ice cream mochi to a small ice cream shop in the city of Kanazawa, located in the Ishikawa Prefecture in Japan. The shop owner Yasukichi Kawabata, had the idea of wrapping small balls of ice cream in sweet mochi dough to create a unique and tasty treat. Then ice cream mochi quickly became popular among locals and visitors, and the idea eventually spread to other parts of Japan and beyond. Frances Hashimoto is credited with introducing this sweet to America and in 2021 it became popular on TikTok causing massive sales spikes for ice cream at Tesco in the UK.
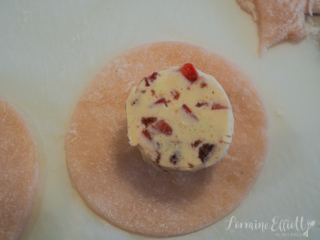
The texture of mochi is due to the glutinous rice or mochiko flour used to make it, which has a high starch content that creates a gummy and stretchy texture when cooked. This recipe works for ice cream or fresh cream mochi. Fresh cream mochi is where you use whipped cream and fruit inside the mochi and these are kept in the fridge. In fact I prefer this with fresh cream rather than ice cream and I think using fresh cream is easier than ice cream! I think the texture of fresh cream mochi is better than ice cream mochi. It's such a light, fluffy sensation eating a fresh cream mochi. I was inspired to make these by the fresh cream mochi at Mochipang.

Tips for Making NEVERFAIL Ice Cream and Fresh Cream Mochi
1 - There are some non-negotiables when making ice cream mochi and the first is that your ice cream or cream balls must be frozen solid. Like HARD AF. That means you need to scoop them AT LEAST 2 hours before you make your mochi. I do it the night before. It will be very, very difficult to shape your mochi if they aren't frozen rock hard. Trust me, I tried it and ended up with a giant mess haha!
2 - For that reason I prefer fresh cream mochi because ice cream has to be slightly soft in order to scoop it and then it drips everywhere when you're scooping it. Whipped cream doesn't melt straight away and holds it shape. I also prefer the taste and textural sensation of fresh cream and mochi skin.
3 - Use a large (2oz/60g) ice cream scoop to scoop your ice cream or fresh cream and make sure that it has a flat bottom. Place it on cupcake liners in the freezer (I had a silpat that I used).
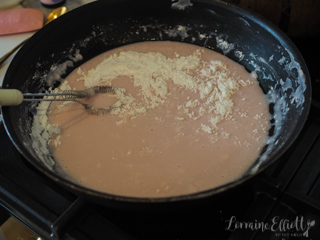
4 - Make sure your pan is non stick pan and that the non stick is still well...not sticking! :)
5 - Speaking of flour, another non negotiable is using mochiko or sweet glutinous rice flour. Despite the name it is gluten free and without this, your mochi will not work. I've never seen it at the supermarket, only Asian grocery stores.
6 - Some recipes use potato starch or cornflour to roll their mochi. But you will get the best results if you roll it in toasted mochiko or glutinous rice flour. Make sure to toast it so that you aren't eating the flour raw as it is better for digestion.
7 - Starch or flour is your best friend when it comes to making mochi. When it comes to rolling out your mochi use a large rolling pin and a lot of the toasted glutinous flour to shape it into a rectangular or square shape. Also trim the ends that are thicker. HOWEVER when it comes to shaping your mochi, make sure to brush all of that excess flour away to make it easier to seal.
8 - I always cool the rolled out mochi dough at room temperature and always cover it with cling film to prevent it drying out. When it dries out the mochi can crack making it hard to wrap up. While the fridge is faster I find that it can dry out the mochi skins. Make sure the mochi skins are completely cold when you wrap them.
9 - The other trick with making sure there isn't a big lump of mochi at the bottom (apart from trimming the thicker ends when cutting into squares) is to make sure that you trim the bottom with a pair of scissors and have a bowl of water ready to dip your fingers into. The water will make the mochi sticky again so that you can seal up the trimmed bottom.
10 - Place the mochi on cupcake liners. Place ice cream mochi in the freezer for 20 minutes to firm up. If you're eating ice cream mochi that has been stored in the freezer for a while let it rest at room temperature for 10 minutes to make it better to eat. Store all fresh cream mochi in an airtight box in the fridge and eat within 1-2 days.

I made a big batch of these for our anniversary as Mr NQN and I both love mochi so much. We don't really do that much for our anniversary. My friend told me about a couple that goes to elaborate lengths every year to celebrate their anniversary. For example for the wood anniversary, they will book a restaurant with a wood fire oven, they will buy a piece of wooden furniture together and will go for a walk in the woods. It is all very admirable but for us, I just bought Mr NQN a packet of dried mango and he bought me a big bouquet of flowers and we went out for dinner. I did make this mochi for both of us as we both adore it.
But as we always have different tastes. I absolutely love cream mochi so I made some for myself while Mr NQN loves ice cream mochi so he got a big batch of those. I came across a piece of advice recently too especially if you're sort of opposite personalities like Mr NQN and I. It was when one of you is going through a crisis or having a bad day and the other is flailing and trying to help unsuccessfully it is to ask, "Do you want comfort or solutions?". I must admit that when someone is in crisis I'm always trying to think of solutions or ways to try and solve the situation but sometimes people want comfort and for someone to listen to them and that's all they want. They don't want a plethora of action plans. I've definitely been on the other side when someone is just trying to give me ideas on what to do and I don't want to hear them so I thought that this was sage advice that came just in time for our wedding anniversary!
So tell me Dear Reader, do you like ice cream mochi or fresh cream mochi? What do you think of that advice? And do you do something special for your anniversary?


Reader Comments
Loading comments...Add Comment