When Mr NQN and I got married a few years ago, we like many other couples had our photos taken by a wedding photographer. As someone that has every minute scheduled and accounted for, we had all sorts of dreams of getting beautiful photographs done on the Harbour Bridge in classic black and white or sepia. Little did we know that we had chosen a church so popular that we were the fourth wedding that day.
A few months before, we were told that we couldn't get the time that we wanted at 3pm and our ceremony would be moved to 4:30pm. "That's fine, we'll have plenty of time for photos!" I said delusionally, probably while tying bows on our invitations or adhering butterflies to them.

Unfortunately, we soon realised that we had no time at all to get the fantasy photos. Thankfully, since we were the last ceremony, we had the run of the church and its beautiful gardens and so with no time to travel anywhere we decided to make this our location. Our photographer was nice and gave us instructions on how to pose. One instruction was to me.
"Look up at him and lean your face against his chest and hold your hand up on his chest and then look up at him adoringly!" he instructed "and you, look down at her."

I looked at Mr NQN. It sounded like an odd request - as if I were a poor damsel looking up at her saviour. Would Mr NQN expect me to look at him like that I wondered? I thought that we were more equal than that. I figured his reaction to this request would tell me a lot about him and what he really wanted or expected from me.
Mr NQN looked at the photographer and then back at me and whispered to me "Errr that sounds a bit weird doesn't it? You don't have to do that." I breathed a sigh of relief, I had the right husband after all!

These cupcakes are for our sixth wedding anniversary that we celebrated yesterday. I wanted to make something that showed the nature of our relationship. How Mr NQN tries to get me to do things that are out of my comfort zone - hot air ballooning is surely on the cards as is all the other sporty things that he tries to get me to do. The dog is of course him (the one that needs to run around) and the cat is me. These cupcakes fit as the traditional gift for a sixth year wedding anniversary is usually candy (how great is that?).
I won't lie, this is a complicated cupcake made up of many parts. And if you make these you may be cursing my name if you want to do this all in one day. But these can be done over a few days, the cookies baked a few days ahead and then decorated on another day and the cupcakes done the day before you want to assemble this and then semi frozen to help keep it upright (they thaw quickly, don't worry you won't be eating frozen cupcakes!). And the buttercream, well you don't have to do salted caramel buttercream but a simple buttercream or your favourite icing will do or just dispense with icing all together! The whole idea is that it can be done in parts with a minimum of stress. Which is quite unlike a wedding!

I leave you with a link that is bound to cheer up anyone that needs it. A lot of people that I've spoken to have had a not so great few weeks of late and this link never fails to put a smile on my face. Click on the picture above to find 20 pictures of cats and dogs hugging it out.
So tell me Dear Reader, do you have low key anniversaries or extravagant ones? Have you had some crappy days of late? And what do you do to cheer yourself up? I cook, shop, surround myself with people that I love and hug it out! :)

3D Hot Air Balloon Cupcakes!
Level of difficulty: hard - I can't lie, these are fiddly
For white chocolate mud cupcakes
-
165g/6ozs. butter (doesnt matter if its at room temp or not in this recipe)
-
120g/4ozs. white chocolate broken up into pieces
-
1 1/3 cups white sugar
-
1 cup water
-
1 cup plain flour
-
1/4 cup cornflour or cornstarch
-
1/2 teaspoon baking powder
-
1 egg
For icing:
-
1/4 cup caster or superfine sugar
-
2 tablespoons water
-
1/3 cup cream
-
175g/6ozs unsalted butter, at room temperature
-
1.5 teaspoons salt
-
2 cups icing or powdered sugar, sifted
Step 1 - Preheat oven to 150c fan forced or 170c non fan forced. Place butter, chocolate, sugar, the water in small saucepan over low heat until melted and combined. Cool for 15 minutes.
Step 2 - Using a whisk, add flour and then egg. Pour into patty tins. Bake for 30-35 minutes or until a skewer inserted comes out clean. Cool in tin.
Step 3 - Make the salted caramel buttercream frosting. In a heavy bottomed small saucepan, dissolve the sugar into the water and then increase heat to medium and allow to turn a golden caramel colour-it will take about 5 minutes to reach the desired colour (but dont forget that caramel still cooks a little after taken off the heat). Add the cream and salt to the caramel and stir well to combine as the caramel will naturally harden and pool together. Allow to cool completely (or place it in a small metal bowl in the fridge or freezer to hurry it along).
Step 4 - In the bowl of an electric mixer fitted with a beater attachment, beat the butter for 5 minutes until pale and fluffy. Turn down the speed to low and add the sifted icing or powdered sugar and beat for 3-4 minutes. Then add the cooled salted caramel and beat until smooth. If it is too liquid, place in the fridge.
Step 5 - Using a fluted tip in a piping bag, pipe over the cupcakes with the icing and store in the fridge.

For cookies:
-
85 g/3ozs butter, softened
-
140g/5ozs white caster superfine sugar
-
1 egg
-
1 teaspoon vanilla
-
180g/6ozs all-purpose flour
-
1 teaspoon ground cinnamon
-
A Christmas bauble or light bulb cutter
-
some long pop sticks that are oven proof (paper ones rather than plastic)
-
cornflour, small edible hearts, medium leaf cutter and a non stick rolling pin
Step 1 - In a large bowl of an electric mixer, cream together butter and sugar until smooth. Beat in egg and vanilla. Stir in the flour and cinnamon. Cover, and chill dough for at least one hour (or overnight but take it out ahead of time to let it become more rollable).

Step 2 - Preheat oven to 400 degrees F (200 degrees C). Roll out dough on floured surface 1/4 to 1/2 inch thick. Using the christmas bauble cutter dipped in flour cut out as many "hot air balloons" as you can-trim the bottom of the dough, my bauble cutter had an extra bit at the end that I needed to cut off. Place cookies 1 inch apart on parchment paper and gently insert the pop stick. Bake for 8-10 minutes in preheated oven. Cool completely.

Step 3 - On a non stick surface or a surface lightly dusted with cornflour roll out the fondant colour of your choice-I used two types of pink and white. Cut out the shape in the fondant using the bauble cutter and with a little water on a paintbrush, adhere the fondant to the cookies-I placed them on the flattest side of the cookie and where there was a bit of a gap with the pop stick-you can use it like blu tack to give the stick and cookie a bit more strength.


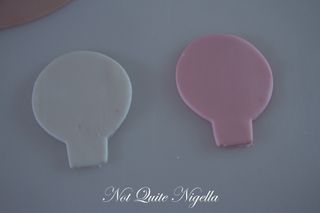
You can also do the pattern by placing one white and one pink cut out on top of each other making sure to dust cornflour in between them so that they don't stick and then cut out shapes. I used a medium leaf cutter and cut out the shapes and then took two cookies and placed the opposite pieces in each one-kind of like those toys that you used to play with as a kid where you fit the part to the hole.


One on top of each other (with cornflour between them to prevent them sticking)

Extras
-
Extra fondant to make the animals in chocolate, white and pink
-
Dried vermicelli noodles for the cat's whisker
-
Edible black pen
-
Candy string
-
extra fondant to glue the string on and the sturdy stick on the back if you need it
Step 1 - Make the animals-you are only making the heads and the arms so it isn't too hard. To make the dog's head roll some chocolate fondant into a ball and then make a smaller ball and attach it as the nose and pinch it so that it becomes a little pointy. Affix a tiny pink ball on the end for the nose. Roll ears-you want thin, long ovals that you can attach with a little water onto the head (you can position them to make them look "floppy." Roll tiny white balls and affix these eyes and draw an iris in the centre of the eye.
Step 2 - To make the cake roll a ball of fondant (I rolled a white and brown ball to make a white and black cat). Make the ears but rolling some fondant out and cutting out two triangles and affix these to the head with a little water. Affix a tiny pink ball on the end for the nose. Roll tiny white balls (cat's eyes are more oval shaped than dog's) and affix these eyes and draw an iris in the centre of the eye. Break off tiny bits of vermicelli and add two to each side of the nose. To make arms for the cats and dogs, roll out some sausages of brown fondant. Place the animals, two to a cupcake and put the arms hanging over the edge of the cupcake like they are looking over the edge of the basket.
Step 3 - To assemble I find it easiest if the cupcake is frozen. This allows the cookie to stand upright and helps if you are displaying these although these are not the types of cupcakes that will stand for a long display time especially outside of air conditioning. Now that the cookies are decorated and the cupcakes are iced, this is the last part. Take a chopstick or an extra pop stick and dig a hole eight in the centre of the frozen cupcake. This is where you hot air balloon will sit.

Step 4 - Cut out some lengths of the edible string and roll the fondant into small balls and use it like blu tack to adhere it to the back of the cookie. It should reach to the buttercream. If you really want to display these, use an extra pop stick and some fondant as blu tack on the back of the cookie to prop it up from the back.


Reader Comments
Loading comments...Add Comment